


Ender 3 V3 Ke Cura Profile Settings Tutorial
Unlocking the full potential of your Ender 3 V3 KE is easy with the right Cura settings. As of now, there isn't a predefined profile for the Ender-3 V3 KE in Cura. This guide will show you the best configurations for your Ender-3 V3 KE. Whether you're a beginner or an experienced user, understanding these settings will help you achieve excellent print quality.
Here is a step-by-step guide for Ender 3 V3 Ke Cura settings.
Ender-3 V3 KE: Affordable & Beginner Printer, Smarter & Faster
【X-axis Linear Rail: Ultra-Smooth Motion and Stable Structure】
【Max Printing Speed 500mm/s*; Max Acceleration 8000mm/s²*】
【LAN & Could Printing: Control and Monitor Smartly from Anywhere】
【Smart UI: "Creality OS" Smart Beyond Limits】
【60W Ceramic Heater 300°C* Copper Nozzle More Filament to Print】
【Double Fans for Rapid Model Cooling in Good Shape】
Ender-3 V3 Ke Cura Initial Setup
1. Add a New Printer:
- Go to "Settings", then "Printers", and "Add Printer";
- Select "Non-networked printer", choose "Creality 3D", and select "Ender-3 Pro".
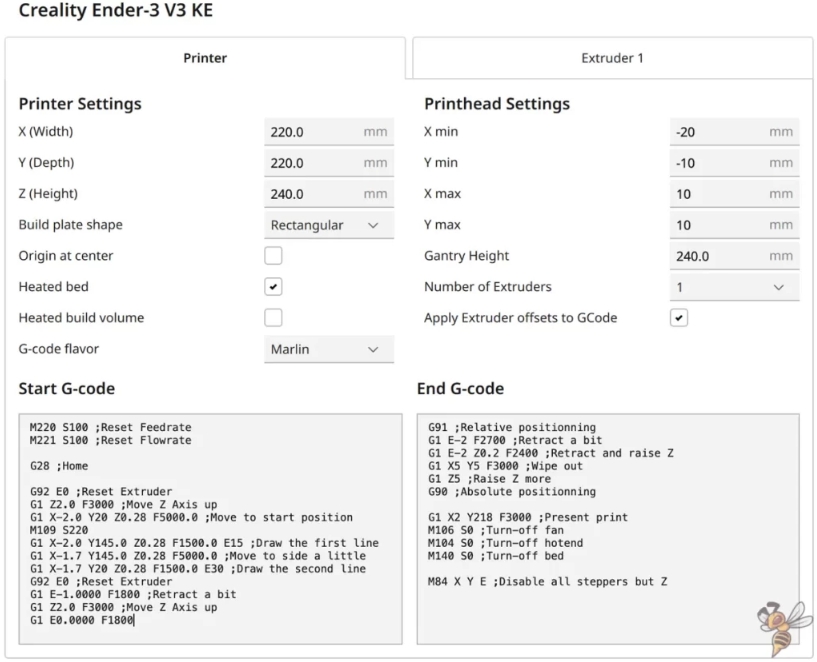
- Adjust the parameters to fit the Ender-3 V3 Ke:
Build Plate Dimensions:
- Build Plate Dimensions: The X and Y dimensions remain the same as the Ender 3 Pro, but the height should be set to **240mm** instead of 250mm.
- G-code Flavor: Select "Marlin" to replace the default "Creality OS".
- G-code Customization: After the G28 code, add the G29 code for bed leveling.
2. Standard Settings:
- Layer Height: 0.2mm
- Line Width: 0.4mm
- Wall Thickness: Adjust as needed, with an original setting of 0.8mm.
- Infill Density: 20%
- Printing Temperature: 210°C
3. Printing Speeds:
- General Speed: 300mm/s
- Wall Speeds: Inner: 300mm/s. Outer: 200mm/s
- Initial Layer Speed: 100mm/s
- Top and Bottom Speed: 200mm/s
4. Additional Print Settings:
- Retract Settings: Enable retraction and adjust settings accordingly, especially for direct-drive printers like the Ender-3 V3 Ke.
- Acceleration Control: It's recommended to enable acceleration control but not jerk control.
Ender-3 V3 Ke Cura Start and End G-Code Settings
Start G-Code:
gcode
- M220 S100; Reset feed rate
- M221 S100; Reset flow rate
- G28; Home
- G29; Bed leveling
- G92 E0; Reset extruder
- G1 Z2.0 F3000; Move Z Axis up
- G1 X-2.0 Y20 Z0.28 F5000.0; Move to start position M109 S220
- G1 X-2.0 Y145.0 Z0.28 F1500.0 E15; Draw the first line
- G1 X-1.7 Y145.0 Z0.28 F5000.0; Move to side a little
- G1 X-1.7 Y20 Z0.28 F1500.0 E30; Draw the second line
- G92 E0; Reset extruder
- G1 E-1.0000 F1800; Retract a bit
- G1 Z2.0 F3000; Move Z Axis up
- G1 E0.0000 F1800
End G-Code:
gcode
- G91; Relative positioning
- G1 E-2 F2700; Retract a bit
- G1 E-2 Z0.2 F2400; Retract and raise Z
- G1 X5 Y5 F3000; Wipe out
- G1 Z5; Raise Z more
- G90; Absolute positioning
- G1 X2 Y218 F3000; Present print
- M106 S0; Turn-off fan
- M104 S0; Turn-off hotend
- M140 S0; Turn-off bed
- M84 X Y E; Disable all steppers but Z
Ender-3 V3 Ke Cura Material-specific Settings
PLA:
- Print Temperature: 200°C
- Bed Temperature: 60°C
- Print Speed: 180-250 mm/s
- Retraction: 0.8 mm at 40 mm/s
- Cooling: 100%
ABS:
- Print Temperature: 250°C
- Bed Temperature: 100°C
- Print Speed: 150 mm/s
- Retraction: 0.5 mm at 40 mm/s
- Cooling: 50%
TPU:
- Print Temperature: 215°C
- Bed Temperature: 30°C
- Print Speed: 100 mm/s
- Retraction: 2 mm at 40 mm/s
- Cooling: 100%
PETG:
- Print Temperature: 230°C
- Bed Temperature: 80°C
- Print Speed: 150 mm/s
- Retraction: 1.2 mm at 40 mm/s
- Cooling: 50%
By optimizing these parameters and performing slicing in Cura, excellent printing results can be achieved. The final step is to export the sliced file and upload it to the printer.
Ender-3 V3 Ke Cura Troubleshooting Common Issues
Despite optimal settings, you may encounter issues. Here are some tips for common problems:
1. Warping or Poor Bed Adhesion
- Level the Bed: Ensure your bed is properly leveled.
- Adjust Bed Temperature: Increase the temperature slightly for better adhesion.
- Use Adhesives: Apply a glue stick or hairspray to the bed.
2. Stringing or Oozing
- Optimize Retraction: Increase retraction distance and speed.
- Adjust Temperature: Lower the nozzle temperature by 5-10°C.
3. Inconsistent Extrusion
- Calibrate Extruder: Make sure your extruder is properly calibrated.
- Check Filament Quality: Use high-quality filament to avoid inconsistencies.
Related Article:
Best Cura Profile Settings For Creality K1 & K1 Max >>
Final Thoughts
Setting up your Ender 3 V3 KE Cura is a journey of experimentation and learning. By starting with the recommended settings and making adjustments based on your specific needs, you can consistently produce high quality prints.
Remember to make notes of what works and what doesn't, and don't be afraid to experiment. 3D printing is as much art as it is science, and finding the perfect settings for your Ender 3 V3 KE will ensure that your prints come out great every time.
Read more if you are interested in:
Recent News

Creality Ender 3D Printers Compared: Which Printer Is Better for You?

3D Printer Nozzle Blocked? Causes and Safe Fixes

10 Best Back-to-School 3D Prints for Students in 2026
