


Best PrusaSlicer Profiles Settings for Creality K1 Series
3D printing enthusiasts know that achieving the perfect print is a blend of the right hardware, software, and settings. If you are using a Creality K1 or K1 Max printer with Prusa Slicer, you might be wondering what the best profiles and settings are to achieve optimal results.
In this article, we will explore the best Prusa Slicer profiles settings for Creality K1 and K1 Max to help you get started on your 3D printing journey. Other slicer for Creality K1 Series, you can click to Best Cura Profile Settings For Creality K1 & K1 Max.
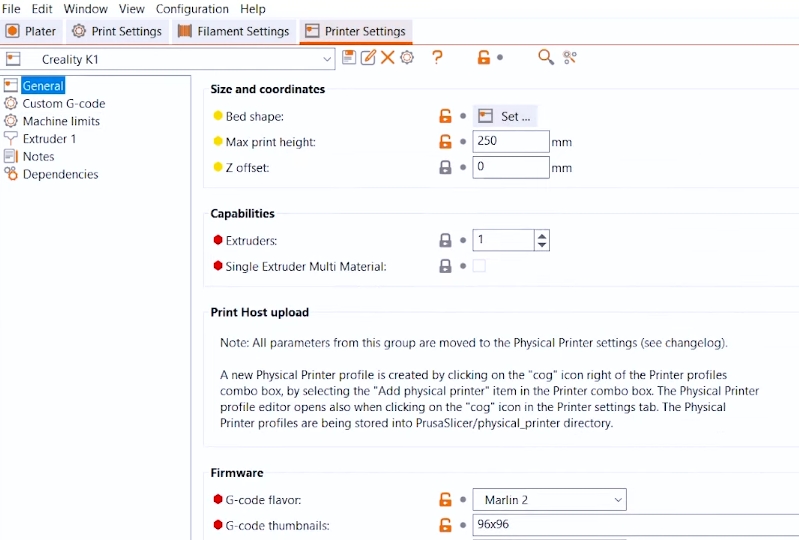
Setting Up PrusaSlicer with Creality K1 and K1 Max
PrusaSlicer boasts a prominent feature known as the Configuration Wizard, which provides access to community-curated profiles for a wide array of 3D printers. Although there's no default profile for K1 or K1 Max as of now, you can still make use of the wizard.
Simply navigate to the Custom Printer section under the Configuration tab in PrusaSlicer, choose "Define a custom printer profile", input your preferred custom name, and click Finish. Once your new profile is set up, switch PrusaSlicer into Expert mode to view all the necessary settings we'll be discussing hereafter.
Basic Configuration step-by-step here:
- Add K1/K1 Max Printer Profile: Click the [Configuration] menu, select [Add/Remove Presets] and choose [Add Printer]. Then click [Custom Printer] and enter the details for your Creality K1 or K1 Max.
- Configure Printer Settings: Input the basic specifications of your K1/ K1 Max printer, including bed size, nozzle diameter, and firmware type.
Optimal Prusa Slicer Settings for Creality K1 and K1 Max
1. Speed Settings
The key advancement of the K1 series over traditional printers like the Ender 3 lies in its substantial speed enhancement, reaching up to a remarkable 600 mm/s. However, optimum print quality rarely coincides with maximum speed. At the same time, a balanced acceleration setting that takes print quality into account is crucial.
A balanced approach would be to set infill and travel at 10,000 mm2/s, while maintaining other areas at a moderate 5,000 mm2/s. The ideal range for most users is around 300 mm/s, effectively balancing quality and speed. External perimeters might necessitate deceleration to about 70-90% of the perimeter speed for superior-looking parts.
Infill and gap fill speeds can be comfortably set between 60-100 mm/s, while a travel speed of 600 mm/s should not impact quality.
In essence, PLA and ABS print excellently at 200-300mm/s, PETG at 180mm/s, while TPU is best printed at 80mm/s.
2. Retraction and Temperature Controls
Retraction settings should be finely adjusted to accommodate the specific filament in use and any printer modifications. As a starting point, consider a retraction distance of 0.5 mm at 40 mm/s.
K1-operated print temperatures can trend hotter for successful high-speed printing without extrusion issues and are filament-dependent. Filament manufacturers often provide specific print temperatures as a guideline. Nozzle size and speed also impact print temperature, so it's advised to initially print a temperature tower for a new filament.
The recommended temperature varies between filament types, so always starting with the manufacturer's recommendation is advisable.
3. Cooling, Infill and Perimeters
Quick freezing of the filament, post-nozzle, is crucial to ensure quality prints, especially at the K1's high speeds and temperatures. Maximize cooling for PLA prints and minimize it for ABS and TPU. For PETG, maintain a fan speed of 20-40%. Utilize K1's side-mounted blower fan with PrusaSlicer’s G-code substitutions for enhanced cooling.
- Click Add to create a new substitution.
- For Find, enter “^M106 S(d+)$”
- For Replace with, enter “M106 P0 S$1nM106 P2 S$1”
- Check the boxes for Regular expression and Case insensitive.
Infill type, percentage, and perimeter number dramatically influence print time and strength. A higher infill percentage and more perimeters result in lengthier print time but greater toughness. Standard infill patterns such as Gyroid, grid, or rectilinear are good choices. More perimeters and top/bottom layers translate to enhanced print strength.
A standard suggestion would be 15-50% infill with 2-3 perimeters and 3-4 top/bottom layers.
4. Fine-Tuning Layer Height
Layer height is another crucial setting impacting the quality and speed of your 3D printed parts.
For parts requiring high detail, go for smaller layer heights (0.1-0.15 mm), while quick, less-detail-focused prints can take larger layer heights (0.2 mm onwards).
5. Advanced Tips & Tricks
In addition to these basic settings, below are some advanced tips that can help make the integration between your Creality K1 (Max) printer and PrusaSlicer experience even better:
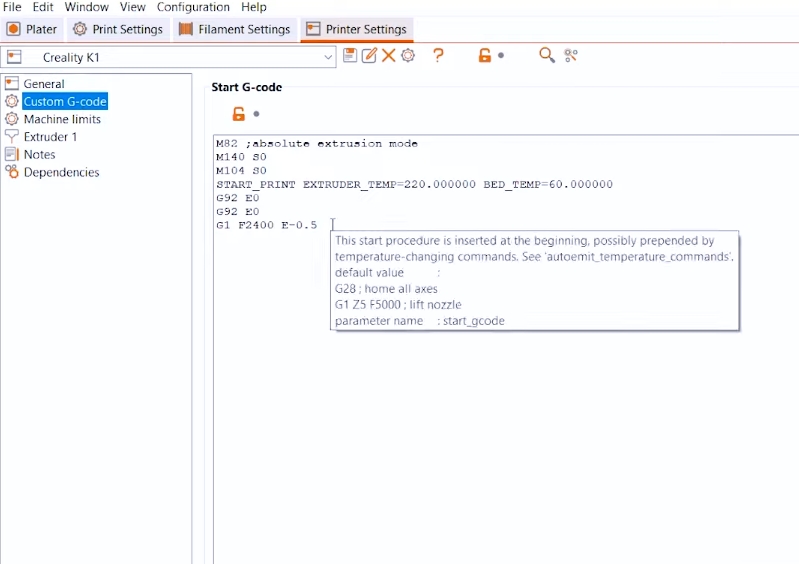
-
Start and End G-code: Adjust these under [Printer Settings] > [Custom G-code] for K1 compatibility for proper pre-print preparation and post-print cooldown. Enter “END_PRINT” in the End G-code field and your maintenance-related commands in Start G-code.
M140 S
M104 S0
START_PRINT EXTRUDER_TEMP={first_layer_temperature[0]} BED_TEMP
{first_layer_bed_temperature[0]} - Klipper: Ensure "Klipper" is selected as your G-code flavor under Printer Settings > General > Firmware > G-code flavor, for compatible G-code generation, reducing chances of error.
- Build Volume: If using K1 Max, adjust your build volume in PrusaSlicer under Printer Settings > General > Size and coordinates. Update both horizontal (Bed shape) and vertical (Max print height) dimensions to 300 mm to utilize the full print space.
- Machine limits: Tweak these under Printer Settings > Machine limits to match the K1's capacities - 600 mm/s print speed (feedrate), 20,000 mm2/s acceleration for accurate print time estimations.
- G-code thumbnails: Enable these for print previews on the printer screen/web interface under Printer Settings > General > Firmware. Input “96×96, 300×300” into the textbox.
Conclusion
By setting up custom profiles and fine-tuning the settings, you can achieve high-quality prints consistently. Regularly calibrate your printer and perform test prints to optimize your settings. If your initial prints aren’t perfect, don’t get discouraged. Make minor adjustments, take notes, and you'll soon unlock the ideal settings for your personal printing needs. With the right approach, your Creality printer and Prusa Slicer can become a powerful combination for all your 3D printing projects.

Recent News

Creality Ender 3D Printers Compared: Which Printer Is Better for You?

3D Printer Nozzle Blocked? Causes and Safe Fixes

10 Best Back-to-School 3D Prints for Students in 2026
