


3D Printer Layer Shift Troubleshooting: Top 5 Solutions
Layer shifting in 3D printing can be a frustrating problem. It can ruin hours of printing and waste valuable filament. Understanding what causes layer shift is the first step to fixing it.
In this comprehensive guide, we'll delve into the world of 3D printer layer shift and explore its causes, symptoms, and most importantly, how to fix it.
Layer Shifting Definition: What is 3D Printer Layer Shift
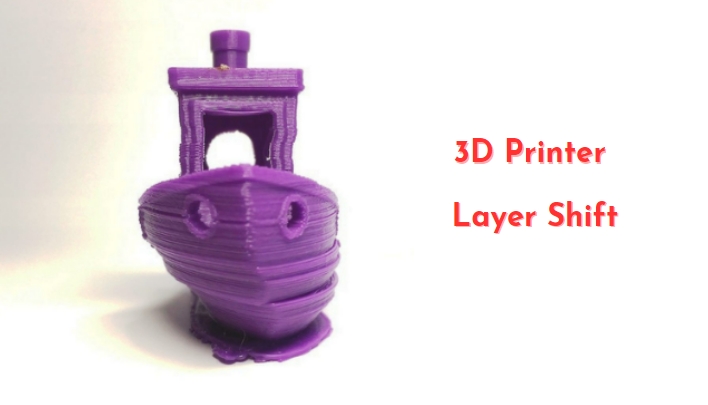
Layer shifts, also referred to as layer misalignment, occur when the printer's extruder fails to move to the correct position, resulting in improperly aligned layers. These shifts can occur along any of the printer's axes - X, Y, or Z - but are most frequently observed on the X and Y axes. Layer shifts have a significant impact on the quality of your 3D prints, potentially leading to deformities, weak points, and, in severe cases, complete print failure.
Grasping the root causes of these shifts is essential for preventing them and ensuring consistently high-quality prints.
What Causes Layer Shift
Layer shift in 3D printing can be caused by a variety of factors. These can range from mechanical problems to software errors.
One common cause is loose belts or pulleys. If these components aren't tight, they can slip during printing, causing the extruder to move to the wrong position.
Another common problem is incorrect print speed. If the printer is moving too fast, it may not have enough time to lay down the filament properly, causing layer shifts.
Environmental factors can also play a role. Vibrations or drafts can cause the printer to move, resulting in misalignment.
Finally, software or firmware problems can cause layer shift. If the printer's software isn't configured correctly, it may not be controlling the extruder's movement accurately.
Here are some common causes of layer shift:
- Loose belts or pulleys
- Incorrect print speed
- Environmental factors
- Software or firmware problems
3D Printer Layer Shift Troubleshooting
1. Diagnosing the Direction: 3D Print Getting XY Layer Shift
Identifying the direction of the layer shift can help pinpoint the problem. Shifts along the X or Y axis are the most common.
- X-axis shifts are often caused by loose belts or pulleys on the X-axis motor.
- Y-axis shifts can be caused by similar problems with the Y-axis motor.
- Z-axis misalignment is less common, but can be caused by problems with the Z-axis lead screw or motor.
1.1 Troubleshooting Y-axis offsets
Y-axis offsets can interfere with your 3D printing. The first step in troubleshooting is to check the tension of the Y-axis belt.
A loose belt can cause the print head to move unevenly. Tighten the belt if it's loose, but avoid over-tightening, as this can stress the motor.
Next, inspect the Y-axis motor and pulleys. Make sure they are securely attached and functioning properly.
Lubricate the Y-axis rods to ensure smooth operation. Use a light machine oil or a lubricant designed for 3D printers.
1.2 Fixing X-Axis Layer Shifts
X-axis misalignment can also affect your 3D prints. Start by checking the X-axis belt tension.
A loose belt can cause uneven movement of the print head. Tighten the belt if necessary, but avoid over-tightening to prevent motor stress.
Next, inspect the X-axis motor and pulleys. Make sure they are securely attached and operating as they should.
Lubricate the X-axis rods for smooth operation. Use a light machine oil or a lubricant designed for 3D printers.
2. Calibration & Maintenance of Your Printer to Prevent Layer Shift
Regular calibration and maintenance can prevent many layer shift problems. Start by leveling the bed. A level bed ensures proper adhesion of the first layer. Use the printer's built-in leveling feature or a manual method.
Next, calibrate the extruder. This will ensure accurate filament deposition and reduce the likelihood of layer shift.
Maintain a clean print bed. Remove any remaining filament or debris before starting a new print.
Check and tighten the printer's screws and belts regularly. Loose components can cause jamming.
Here are some maintenance tasks you should perform regularly:
- Clean the print bed
- Check and Tighten Screws and Belts
- Lubricate moving parts
- Check and adjust belt tension
- Update printer firmware
- Calibrate extruder and bed level
3. Environmental Factors and Printer Stability
Environmental factors can also cause layer shift. Vibration is a common culprit.
Make sure your printer is on a stable, level surface. This will reduce vibrations that can disrupt print layers. Drafts can also cause problems. Avoid placing your printer near windows, doors, or air vents.
A stable environment and printer setup can greatly reduce the risk of layer shifting.
4. Software and Firmware Solutions
Software and firmware issues can also cause layer shifting. Make sure your printer firmware is up-to-date.
Also check your slicer settings. Incorrect printing settings can cause shifting, such as printing at too high a speed. Printing at higher speeds can put excessive stress on the moving parts of your 3D printer, causing vibration and even loosening of screws and bolts.
In addition to speed, make sure the temperature is consistent. For example, if the bed temperature is inconsistent or set too low, the first layer may not bond properly to the surface, causing parts to peel off and subsequent layers to become misaligned, especially due to warping and curling of the base layer.
5. Seek Professional Help or Community Support
If you've tried everything and still can't fix the layer shift, it may be time to seek help. Contact the
manufacturer or a professional technician. Don't forget about online communities (Creality Could maybe a good choice). They can be a great source of advice and support.
Conclusion
Layer shift can be a frustrating problem in 3D printing. But with patience and systematic troubleshooting, you can resolve them effectively. Remember, an ounce of prevention is worth a pound of cure. Regular maintenance and calibration of your 3D printer can help prevent layer shift.
Here's a quick checklist for future prints:
1. Ensure proper calibration and bed leveling.
2. Check belt tension and pulley tightness.
3. Maintain a stable print platform.
4. Monitor print speed and temperature settings.
5. Keep the printer clean and well lubricated.
By following these steps, you can ensure high-quality, shift-free prints every time.
Related Articles:
FDM 3D Printer Troubleshooting Guide
Ender-3 V3 SE Needle Cleaning Nozzle & Nozzle Replacement
Ideal PLA Bed and Nozzle Temperature Guidelines
Recent News

8 Halloween 3D Print Ideas to Make Before October 31

Ender Series 3D Printers Parameter Comparison

Creality Back-to-School Sale 2026: Save Up to 50% on 3D Printers and More
