



Ender-3 V3 SE 3D Printer: Best FDM 3D Printer under $200 in 2024 - All3dp
【250mm/s max printing spee 】
【2500mm/s² acceleration】
【Auto leveling and Z offset】
【"Sprite" Direct Extruder】
【Stable dual Z-axis】
3D Printer Supports: 3 Easy Steps to Perfect Prints
all
2024-12-23 04:55:43
3D printing is a captivating process, capable of turning virtual designs into physical gadgets. However, like the whole thing on Earth, it's limited by using gravity. This quandary approach is that some designs require an extra guide to print correctly.
Without those supports, components of the model may additionally sag or disintegrate during printing. In this newsletter, we're going to manual you via 3 easy steps to make certain your 3D prints come out flawlessly on every occasion.
We'll be cognizant of using Cura slicer settings, however, the ideas observe to maximum reducing software. Let's get started!
Ender-3 V3 SE 3D Printer
Step 1: Decide Whether to Use Supports
Not each 3-D print desires supports. Knowing when and a way to keep away from them can prevent time and material, and result in a purifier print.
Deciding on Supports
To decide in case your model needs support, do not forget the elements:
- Overhangs and Bridges: Overhangs are elements of the print that expand outward into space. If those angles are more than 60 tiers, support is commonly necessary. Bridges are horizontal spans among two points of the version. If the bridge is too long, it's going to need support beneath to save you sagging. To visualize this, think about the letter ‘T’. The top horizontal part creates a ninety-degree overhang, that is challenging for the printer to address without assistance.
- Printer Performance: Each printer handles overhangs differently. Conducting an overhang test for your printer can support you apprehend its talents. If your printer struggles with 60-degree overhangs, you will need supports for comparable or steeper angles. Testing may be done by way of printing models in particular designed to venture overhang abilities, presenting perception into the gold standard settings in your machine.
- Print Speed: Faster print speeds can take care of overhangs and bridges better than slower speeds. If you print slowly, you might need to apply supports for angles that would not require them at better speeds. This is due to the fact faster speeds can support solidify the fabric quicker, reducing the chance of sagging.
Avoiding Supports
Where possible, it is nice to layout your version or position it in a manner that reduces the want for support:
- Orient the Print Correctly: Position your model so that overhangs are minimized. For instance, printing the letter 'T' flat on its back removes the want for supports in comparison to printing it upright. This easy exchange can save both time and fabric. Use your slicer’s preview function to visualize the print orientation and perceive areas that can require assistance.
- Reduce Overhang Angles: If you are designing the version, use fillets and chamfers to soften sharp overhangs, making them simpler to print without support. These design modifications can extensively enhance print satisfaction. Rounded edges are simpler for the printer to deal with, reducing the chance of defects.
- Split the Model: For complex shapes like spheres, don't forget to print them in two halves and glue them together. This method avoids the full-size supports wished for an unmarried print. By splitting the model, you can role every part optimally, minimizing overhangs and supports.
- Design for 3D Printing: Use CAD software to alter your version's layout, especially for the 3D printing manner, lowering the need for support. Designing with printing constraints in thoughts can result in more efficient prints. This may contain including extra structural elements that may be removed submit-printing or redesigning certain capabilities to be more printer-pleasant.
Step 2: Pick a Support Type
If supports are unavoidable, selecting the right kind could make a massive difference in the final print's high-quality and simplicity of removal.
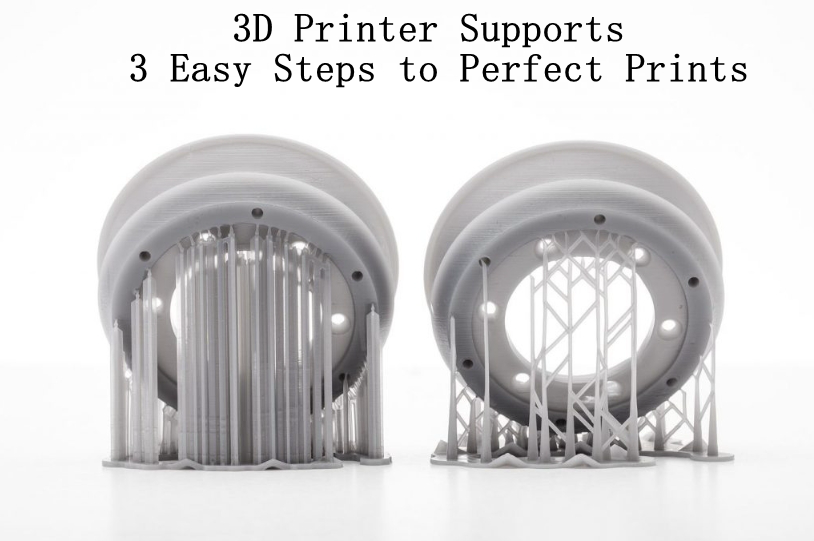
Lattice Supports
Lattice supports are the most common type. They're clean to personalize and paintings nicely for maximum models. However, they can go away marks on the floor and be tough to put off. Use lattice supports for flat or steep overhangs.
In Cura, enable “Generate Support” and choose your selected guide sample. The default “Zig Zag” sample is a great place to begin, but different alternatives like “Concentric” might be better for circular overhangs. The desire for a pattern can have an effect on the steadiness of the print and the benefit of casting off the supports later on.
Dissolvable Supports
For a purifier finish, do not forget dissolvable supports. These are printed with a separate, water-soluble filament. After printing, soaking the model in water dissolves the supports, leaving a pristine print. This method requires a dual extruder printer and unique filament, making it a pricier however excellent choice.
Dissolvable supports are particularly useful for notably distinctive fashions or complex geometries in which removing traditional supports might damage the print. If you have got access to a twin extruder printer, this method can appreciably enhance your print pleasant.
Step 3: Set the Support Density
The density of your supports impacts both the print high-quality and the benefit of support removal.
Choosing Support Density
Start with an aid density of about 10% and alter based totally on your wishes. In Cura, use the “Layer view” to preview supports and make sure “supporters” are seen.
- Print Speed: Higher speeds can paint with lower support densities. If you are printing slowly, you might want denser supports. Lower densities store fabric and make aid removal easier but won't offer an okay guide for complex prints.
- Desired Print Quality: Higher densities offer better support however boom print time and problem in removal. For splendid prints, you might use densities up to 20%. Balancing support density is fundamental to attaining the desired print pleasant without making support elimination too hard.
- Size of Overhang: Larger overhangs require denser supports. For intense angles, use a minimum of 15% density. The length and angle of the overhang can extensively have an effect on the important aid density. Ensure you tailor the density to the specific requirements of your model.
- Ease of Removal: Denser supports are more difficult to cast off. The balance between print quality and simplicity of removal to locate the most excellent density. Experiment with extraordinary densities to determine what works satisfactorily for your specific prints.
For more Creality 3D Printer with Other Slicer, you can click the related articles as follows:
 Related Articles:
Ender 3 V3 Ke with Cura: Settings & Guide >>
Final Thoughts
Following these 3 steps—figuring out whether or not to apply supports, selecting the right form of support, and placing the proper density—will assist you achieve the best 3D prints. By cautiously considering those factors, you could limit waste, enhance print first-rate, and make the publish-processing of your prints simpler.
Remember, the key to a successful 3-D printing is experimentation and adjustment. Each printer and model may also require different settings, so don’t hesitate to tweak and take a look at until you get the consequences you want. The journey to perfect prints involves studying from print, making adjustments, and constantly improving your manner.
If you’re looking for a dependable and extremely good 3-D printer, recall exploring Creality's range of 3D printers. They offer lots of alternatives to healthy different wishes, ensuring you may attain the high-quality possible prints. Creality's printers are acknowledged for their durability and precision, making them a first-rate choice for beginners and experienced users.
Read more:
Troubleshooting Ender 3 Extruder Skipping Issues
How to Achieve Perfect Bed Leveling on Your Ender 3
PETG Print Speed on the Ender 3
Recent News

all
2026-10-13
8 Halloween 3D Print Ideas to Make Before October 31
Halloween is coming, and the candy stash has already suffered a few unexplained disappearances. W...

all
2026-09-18
Ender Series 3D Printers Parameter Comparison
The Creality Ender Series has evolved significantly since the original Ender-3. What began as an ...

all
2026-08-02
Creality Back-to-School Sale 2026: Save Up to 50% on 3D Printers and More
A new school year is a chance to start fresh projects, develop practical skills and turn digital ...

all
2026-05-26
Is PLA Recyclable?
PLA is a biodegradable plastic derived from renewable resources such as corn starch or sugarcane....