


What is 3D Printing Retraction and How to Fix it
3D printing has revolutionized manufacturing, allowing hobbyists and professionals alike to transform digital blueprints into tangible objects layer by layer. Among the nuances of 3D printing, retraction stands out as a pivotal setting to master. It's all about the fine dance of your printer's extruder: pulling filament back just enough to prevent stringing without causing new issues like blobs or gaps. In this article, we'll unpack the mysteries of 3D printing retraction, giving you the know-how to tweak and test your way to flawless prints.
What Is Retraction in 3D Printing?
Retraction is a key term in the 3D printing world, but what exactly does it mean? Simply put, retraction is the process your 3D printer uses to pull back or "retract" the filament in the nozzle during the printing process. This action is crucial for preventing stringing or oozing, which can occur when the printer moves between different sections of a print without retraction.
Why Retraction Matters
Imagine your printer laying down plastic and moving to a new area to continue printing. Without retraction, filament can ooze out of the nozzle while it travels, leaving thin strands of plastic—commonly known as stringing—across your print. Retraction helps by momentarily reversing the filament, relieving pressure in the nozzle, and ensuring a cleaner move to the next print area.
Key Retraction Settings to Understand
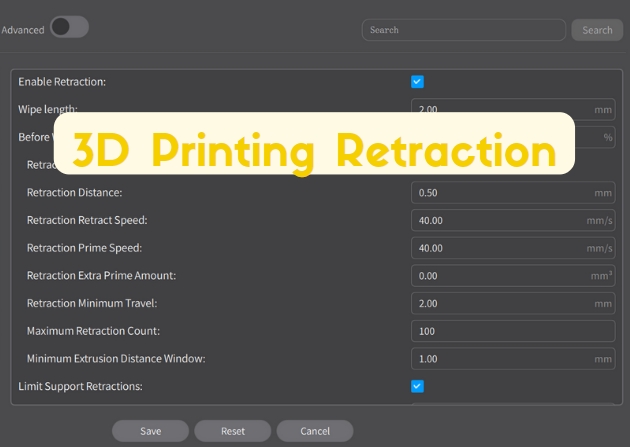
When it comes to dialing in your printer's retraction settings, there are a few key terms you'll need to familiarize yourself with: retraction distance, retraction speed, and flow rate percent.
1. What is Retraction Distance in 3D Printing?
Retraction distance is the length of filament the extruder pulls back. A longer distance reduces stringing but increases retraction time. However, if it's too long, it can cause clogs in the hot end or nozzle.
A typical retraction distance ranges from 2 to 7 mm, depending on your extruder configuration (Direct Drive Extruder or Bowden Extruder), hot end, and other factors; there's no one perfect value. Bowden setups often require longer retraction distances, sometimes up to 15 mm, depending on the tube length. A direct extrusion setup need shorter distances, around 0.5-2.0 mm, depending on the filament. Creality's early Ender series printers, such as the Ender-3 and Ender-3 V2, used Bowden extruders. Currently, most Creality 3D printers use direct drive extruder, offering stable extrusion and reduced blockage. Creality lab tests show the upgraded direct extruders can operate for over 1000 hours without clogging.
To adjust the retraction distance, start by modifying the default value in 0.5 mm or 1 mm increments until stringing is eliminated without causing clogs or other issues. Alternatively, you can try a more intensive approach.
| Filament |
Printing Temp (℃) |
Hotbed Temp (℃) |
Recommended Environmental Temp (℃) |
Printing Speed (mm/s) |
Retraction Distance | Retraction Retract Speed |
| Generic-PLA | 190-230℃ | No heating-60℃ | <60℃ | 40-100 | 0.5mm | 40mm/s |
| Hyper-PLA | 190-230℃ | No heating-60℃ | <60℃ | 40-100 | 0.5mm | 40mm/s |
| Silk-PLA | 190-230℃ | 50-60℃ | <60℃ | 40-80 | 0.5mm | 40mm/s |
| CR-PLA Carbon | 190-220℃ | 50-60℃ | - | 40-80 | 0.5mm | 40mm/s |
| Generic-ABS | 220-260℃ | 90-110℃ | 50-80℃ | 40-80 | 0.5mm | 40mm/s |
| CR-PETG | 230-250℃ | 60-100℃ | - | 40-80 | 0.5mm | 40mm/s |
| CR-Wood | 190-230℃ | No heating-60℃ | - | 40-100 | 0.5mm | 40mm/s |
| HP-TPU | 200-220℃ | No heating-60℃ | - | 30-120 | 2mm | 40mm/s |
| Generic-TPU | 210-240℃ | 50℃ | - | 10-50 | 2mm | 40mm/s |
Creality Official recommended retraction distance and retraction speed settings
2. What Is Retraction Speed in 3D Printing?
Retraction speed is how quickly the filament retracts. Faster speeds can reduce the chance of oozing, but if it's too fast, it might lead to filament grinding or the formation of blobs.
Ideally, use the fastest retraction speed to reduce stringing and printing times. Typically, the default speed is between 30 and 60 mm/s. If this doesn’t work, try lowering it to 10 or 15 mm/s and increase by 5 mm/s increments. Print a test model at each interval until the issue improves. Refer to Creality's recommended retraction distances and speeds for different materials to create better models.
3. Does Flow Rate Percent Affect Retract 3D Print?
Flow rate percent refers to the amount of filament extruded relative to what the printer expects. A higher flow rate can increase the likelihood of oozing, which in turn can make retraction more critical. Adjusting the flow rate can sometimes alleviate retraction issues.
Troubleshooting Retraction Issues
Even with a solid understanding of retraction, you may encounter problems that require troubleshooting. Let's delve into the common issues and how to fix retraction on your 3D printer.
How to Fix Retraction 3D Printer
Retraction issues can manifest in several ways: stringing, oozing, blobs, and gaps. If you notice these problems, it's time to tweak your retraction settings. Start with small adjustments to the retraction distance and speed, observing the changes in your print quality. It's a process of trial and error, but patience will lead you to the sweet spot.
3D Print Retraction Test
To dial in the perfect retraction settings, it's a good idea to run a retraction test. This typically involves printing a specially designed model that will highlight retraction issues, allowing you to adjust settings and immediately see the impact.
There are many retraction test models available online that feature pillars or towers spaced apart, designed to force the printer to make numerous travel moves. By running these tests, you can quickly iterate and find the ideal retraction distance and speed for your specific setup.
Best Practices for Perfect Retraction
To really nail down retraction, there are several best practices you should keep in mind.
1. Start with Recommended Settings
Most printers and filaments come with recommended settings that can serve as a starting point. From there, you can fine-tune based on the results you see in your test prints.
| Creality Filament Setting Recommendations | |||||||
| Filament |
Printing Temp (℃) |
Recommended Printing Temp (℃) |
Hotbed Temp (℃) |
Recommended Hotbed Temp (℃) |
Recommended Environmental Temp (℃) |
Printing Speed (mm/s) |
Recommended Printing Speed (mm/s) |
| CR-PLA | 190-230 | 200℃ | No heating-60℃ | 50℃ | <60℃ | 40-100 | 50 |
| CR-PLA Matte | 190-230 | 200℃ | No heating-60℃ | 50℃ | <60℃ | 40-100 | 50 |
| CR-Silk | 190-230 | 200℃ | 50-60℃ | 50℃ | <60℃ | 40-80 | 50 |
| CR-PETG | 230-250 | 240℃ | 60-100℃ | 90℃ | - | 40-80 | 50 |
| CR-TPU | 210-240 | 225℃ | 50℃ | 50℃ | - | 10-50 | 15 |
| CR-ABS | 220-260 | 240℃ | 90-110℃ | 100℃ | 50-80℃ | 40-80 | 50 |
| CR-Wood | 190-230 | 200℃ | No heating-60℃ | 50℃ | - | 40-100 | 50 |
| CR-PLA Carbon | 190-220 | 200℃ | 50-60℃ | 50℃ | - | 40-80 | 50 |
| CR-PA Carbon | 230-260 | 250℃ | 80-90℃ | 80℃ | 60-80℃ | 40-80 | 50 |
| Ender-PLA | 190-230 | 200℃ | No heating-60℃ | 50℃ | <60℃ | 40-100 | 50 |
| Ender-PLA+ | 190-230 | 200℃ | No heating-60℃ | 50℃ | <60℃ | 40-100 | 50 |
| HP Ultra PLA | 190-230 | 200℃ | No heating-60℃ | 50℃ | <60℃ | 40-100 | 50 |
| HP-TPU | 200-220 | 210℃ | No heating-60℃ | 50℃ | - | 30-120 | 50 |
| HP-ASA | 240-260 | 250℃ | 80-110℃ | 80℃ | 60-90℃ | 30-60 | 50 |
| HP-HIPS | 220-260 | Same of chief material temp |
70-110℃ | Same of chief material temp | |||
2. Keep Detailed Records
Each time you adjust a retraction setting, make a note of it. Documenting these changes can help you understand what works best and avoid repeating past mistakes.
3. Understand Your Filament
Different materials behave differently with retraction. For example, PLA usually requires less retraction distance than TPU, a flexible filament, due to their differing viscosities.
More related articles:
Ideal PLA Bed and Nozzle Temperature Guidelines
4. Consider Environmental Factors
Temperature and humidity can affect filament behavior. Ensure your printing environment is as consistent as possible to reduce variables that might influence retraction.
Advanced Retraction Techniques
Once you've mastered the basics, there are advanced techniques to explore for optimizing retraction.
Retraction Calibration Tools
There are software tools and scripts available to help you calibrate retraction, such as Creality Print, Cura, PrusaSlicer, and so on. These can automate the process of running multiple tests with different settings, making it easier to find the best configuration for your printer.
Custom Retraction Profiles
For those who frequently switch between different filaments and prints, creating custom retraction profiles can save time. This way, you can quickly apply a known good set of retraction settings for a particular material or model.
Z Seam and Retraction Tips
The Z seam is a small imperfection that appears where each layer starts. Slicers like PrusaSlicer and Cura let you control its position—often hiding it in corners. For rounded models, this can cause visible lines, so try using a random seam to reduce patterns. Proper retraction settings also help minimize seam visibility, so fine-tuning both is key for cleaner prints.
More related articles:
Optimizing Z Seam for Perfect 3D Prints
Conclusion
Mastering retraction is a rite of passage in the 3D printing community, and with the right approach, it doesn't have to be daunting. By understanding the fundamentals, patiently testing and tweaking, and applying best practices, you can minimize printing issues and achieve clean, string-free prints. Remember to consider your unique printer and filament characteristics, and before long, you'll have retraction dialed in to near perfection.
People also read:
7 Easy Ways to Deal with PLA 3D Print not Stick to Bed >>
Recent News

8 Halloween 3D Print Ideas to Make Before October 31

Ender Series 3D Printers Parameter Comparison

Creality Back-to-School Sale 2026: Save Up to 50% on 3D Printers and More
