


Creality Falcon2 Pro Toubleshooting Guide
The Creality Falcon2 Pro has been released for half a year, during which time we have been actively collecting feedback from users through all channels, striving to improve and perfect the product to provide satisfactory solutions to customers. Here we will list Falcon2 Pro Top 10 common problems and Top 5 difficult problems, and for these problems to provide detailed causes analysis and solutions. I hope this document is helpful and useful for users.
Creality Falcon2 Pro Tech Parameter Overview
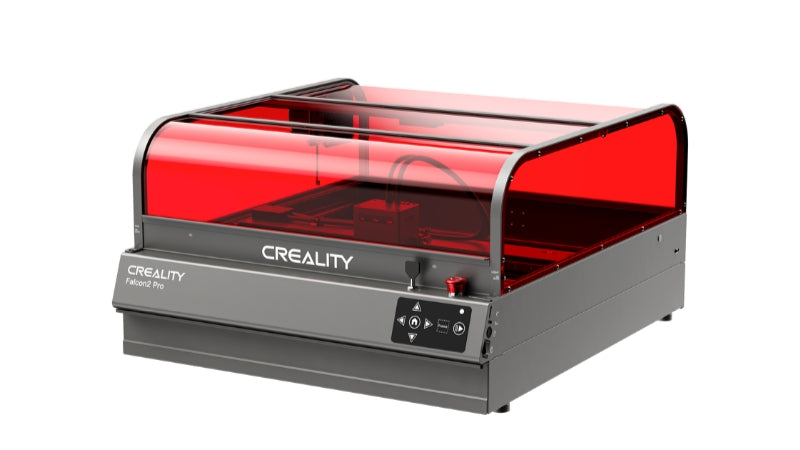
Falcon2 Pro Top 10 Common Problems and Solutions
1. How to buy a 1.6W laser module for Falcon2 Pro?
A 1.6W laser module is included with each Falcon2 Pro shipment (note: 22W is excluded). The module supplied is a product specifically designed to fit the Falcon2 Pro's structure and wiring. It is not currently sold separately. The 1.6W laser module sold on the Creality Store interferes with the structure when installed on the Falcon2 Pro machine, and the focus cannot be adjusted, and the cable interface does not match.
Note: The additional free 1.6W laser module complements the high power engraving for ultra-fine engraving and impeccable detail.
2. What software is compatible with the Creality Falcon2 Pro?
Creality advertises that Falcon2 Pro is compatible with two software: LightBurn and Laser GRBL.
- LightBurn is paid software. Creality does not work with this software company and does not provide a licence code.
- Laser GRBL is free open source software, but there may be problems with the engraving of TF cards. It is recommended to use it online.
Note: If the customer is using pirated LightBurn software, there may be problems with disordered paths in exported G-code files. Creality also plans to release laser cutting software compatible with its own engraving machine next year. If you are interested, you can follow the Creality Falcon official website for the latest news.
3. Why the laser module AIR indicator keeps blinking red?
3.1 Cause Analysis
- Machine standby function
- The air pump is not working
- Air tube connection is not properly connected
- The air tube is bent
- Laser module airflow sensing element is bad
3.2 Troubleshooting and solution
- After the machine is switched on, it will supply power to external devices for 30s, and the power will be cut off after the time is over.
- Restart the machine, in the side knob selected to the maximum, with a hand touch the air pump has no vibration judgement, does not work to make up for the issue of air pumps.
- From the air pump air holes along the air tube to check the interface there is no air leakage and bending parts, timely connection of air tubes and smooth.
- Replace the laser module.
4. Laser module moves slowly to the left or right after switching on the machine
4.1 Cause analysis
Membrane key sensor bad.
4.2 Troubleshooting and solution
Replace the membrane keys.
5. Incorrect start position of engraving preview for online engraving
5.1 Cause analysis
Problems with the engraving start position setting.
5.2 Troubleshooting and solutions
To find the start position options in the bottom left corner of the software, select the appropriate engraving start position.
- Current position --- use the current position of the laser module as the starting point for the engraving preview.
- Absolute coordinates --- take the current position of the graphic placement as the engraving start point for the preview.
- User origin --- take the point set by the user as the engraving start point for the engraving preview.
6. Installation using roller kit, Y-axis moves to the right to hit the bezel
6.1 Cause analysis
Problems with engraving start position setting.
6.2 Troubleshooting and solution
Find the Start Position option in the bottom left corner of the software and set the engraving start position to the current position.
7. The software detects the camera, but cannot click on the next step
7.1 Cause analysis
- The computer system does not allow the software to access the camera.
- The camera is being used by other software
7.2 Troubleshooting and solution
- For example, in Win10, go to Settings → Privacy → Camera, allow applications to access the camera, and then below allow desktop applications to access the camera.
- Close all software except LightBurn.
8. Camera positioning engraving, the actual engraving position deviation is large
8.1 Cause analysis
Replaced the material with different thickness.
8.2 Troubleshooting and solution
Determine whether the thickness of the material used by the customer in the "calibration camera alignment" and the current engraving material thickness is the same, if the use of other thickness of the material number, you need to "re-calibrate the camera alignment".
9. Engraving circles becomes ellipse.
9.1 Cause analysis
- Abnormal machine $ value.
- Rotary setting is turned on.
- Y-axis belt slack.
- Y-axis synchronous wheel top wire loose.
9.2 Troubleshooting and solution
- If the customer has modified the $ value (using the drum kit), you can re-flash the machine motherboard firmware to restore the $ value.
- Once in the software, select Tools → Rotation Settings and Switch Off Rotation.
- Check whether the top wire of the synchronous wheels on the left and right sides of the Y-axis is loose, and re-tighten it.
- Toggle the left and right Y-axis belts by hand to see if they are loose, loosen the screws fixing the Y-axis belt tensioner and re-tighten them, and then fix the tensioner after tensioning.
10. Machine alarm, software prompts error code 24: Lid not closed
10.1 Cause analysis
Did not close the open lid detection
10.2 Troubleshooting and solution
Start carving also need to manually close the open door detection function, otherwise the machine will alarm can not carve, in the front X-axis on the right side of the adapter plate there are two switches, while pressing the two switches (shipping default for the state of the pop-up, pop-up for the state of the open, press for the state of the closed).
Falcon2 Pro Top 5 Difficult Problems and Solutions
1. Laser Module Lens Indicator Flashing Red
1.1 Fault phenomenon
After switching on the machine or starting to engrave, the motherboard indicator and the Lens indicator on the laser module blink red, the machine stops working and makes a drip drip drip alarm sound.
1.2 Cause analysis
The laser module detects a dirty lens and stops engraving.
1.3 Troubleshooting and solution
- Adjust the airflow adjustment knob on the left side of the machine to the maximum, to prevent the cutting material smoke is too large and not blown away in a timely manner, adhering to the lenses.
- Refer to the lens replacement tutorial video, remove the lens to clean, and check the lens for scratches, etc. (a lens will be included with the machine).
- Laser module detection lens dirty sensor is bad, you can connect the machine with the computer, in the software console enter "$ $" often look at the current machine all $ value, and then enter $155 = 0, you can turn off the lens dirty alarm; if the customer does not accept the above scheme, replacement of the laser module.
Note: After cleaning the lens to be the first boot, to short press the black button above the laser module clear alarm information, otherwise there will be a dirty lens alarm!
2. X-axis does not move
2.1 Fault phenomenon
Machine zero operation X-axis does not move, the control panel alone control X-axis also does not move
2.2 Cause analysis
- Motor wires are not plugged in place
- Motor failure
2.3 Troubleshooting and solution
- Check the motor wiring from the motherboard to the Y-axis adapter board, and then to the X-axis adapter board, re-plugging
- Replace the X-axis motor
3. Machine alarm prompts error code 24
3.1 Fault phenomenon
Machine a start carving motherboard indicator light flashing red, online printing software prompts error code 24, the machine is not covered (TF card carving will leave the error file in the card).
3.2 Cause analysis
- Loss of cover magnet
- LED adapter board wires are not connected
- LED board wiring loose
- LED board failure
3.3 Troubleshooting and solution
- LED light board indicator light, check the cover after the cover, LED light board on the two indicators are in the red or blue indicator state (red indicates that there is no magnet, blue indicates that there is a magnet), the red indicator replenishment of magnets, let the customer with glue magnet stick in the hole position.
- LED light board indicator light does not light, check the left side of the machine LED light board and LED wiring is correct, there is no inserted in place, connected or not light, check the LED light adapter board and Y-axis adapter board wiring is correct.
- Remove the white cover of the LED light, check the LED wiring is not loose, re-plugging.
- Replace the LED board.
4. Online software can not recognise the camera
4.1 Fault phenomenon
Connect the machine and camera according to the manual or video, LightBurn software for camera calibration did not identify the camera
4.2 Cause analysis
- The computer does not open the software camera permissions
- Data cable signal transmission abnormality
- Camera adapter board and the camera between the connection line is loose
- Computer USB port abnormality
- Camera bad
4.3 Troubleshooting and solution
- In the computer's computer manager interface, check whether the computer recognises the camera or not, if not, replace the camera with another Type-C cable with data transmission function to connect the camera and the computer.
- Remove the top profile of the shield and check whether the camera and the camera adapter board are connected properly.
- Try to connect the camera to another USB port on your computer or replace the computer with another one.
- Replace the camera.
5. The machine is powered on and does not switch on
5.1 Fault phenomenon
The machine is powered on, the motherboard indicator does not light up, there is no sound, the adapter indicator green light is always on
5.2 Cause analysis
- The key switch is not screwed in place.
- Emergency stop switch does not pop up.
- Key / emergency stop switch wire broken.
- Machine line short circuit.
- The main board switch or the main board itself is faulty.
5.3 Troubleshooting and solution
- Check whether the arrow on the key switch is pointing to the ON position.
- Check whether the emergency stop switch is activated, follow the arrow direction on the emergency stop switch to rotate it to make sure it is activated.
- Machine power off, remove the motherboard plate, the motherboard wiring all unplugged (key and emergency stop switch do not pull), and then connected to the power supply, check the motherboard indicator light is not bright, the motherboard indicator light shows that the machine line is short-circuited, shut down the machine, connected to one of the lines and then open the observation of the motherboard indicator is not bright, repeat the operation to find the short circuit line; if the motherboard wiring is unplugged and power on the motherboard indicator light is not bright, the first replenishment of the hair! Key + emergency stop switch
- Contact the official after-sales service, the replacement board.
Recent News

8 Halloween 3D Print Ideas to Make Before October 31

Ender Series 3D Printers Parameter Comparison

Creality Back-to-School Sale 2026: Save Up to 50% on 3D Printers and More
