


Creality K1 & K1 Max Cura Profile Settings
Cura is a free, open-source slicer widely popular among 3D printing enthusiasts. It welcomes users of all experience levels, from beginners to advanced users. Beginners can focus on the most essential settings, while advanced users can explore over 400 settings in custom mode.
The Creality K1 and K1 Max 3D printers have gained popularity in the community for their affordability and performance. To get the most out of these printers, setting up an optimised Cura profile is essential.
In this article, we'll guide you through the process of creating and customising the Cura profile for the Creality K1 and K1 Max, so you can start your 3D printing projects with confidence.
Here is a detailed guide for setting up the Creality K1 Series Cura.

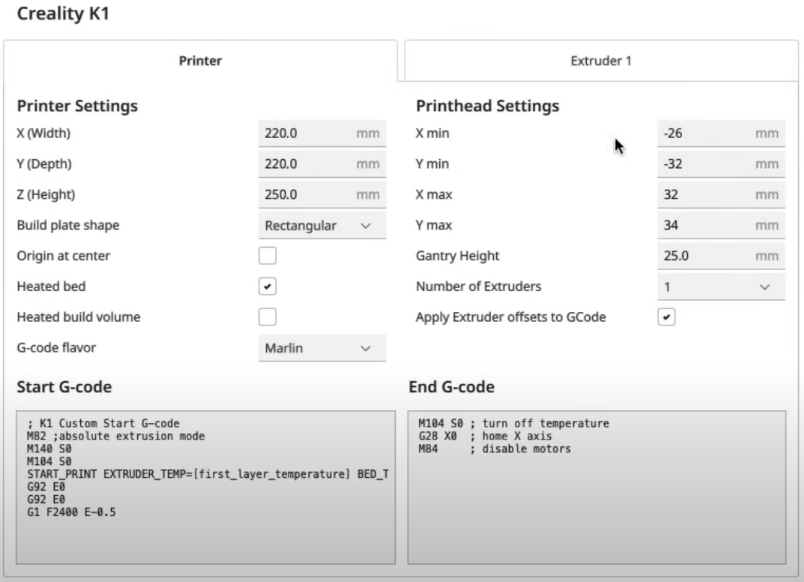
Creality K1 Series Cura Initial Settings
Before you can start printing with your Creality K1 or K1 Max, you need to add it to Cura. Here's a step-by-step guide:
1. Add Creality K1 to Cura:
- Open Cura on your computer.
- Go to【Settings】, then【Printers】, and【Add Printer】;
- Select【Non-networked printer】, choose Creality 3D, and select【Creality Ender-3 S1】.
- Rename【Creality K1】, then click【Add】. Adjust the K1 parameters settings.
2. Creality K1 Printer Cura Custom Settings:
- Build Plate Dimensions: The X and Y dimensions remain the same as the Ender-3 S1, but the【Z (height)】should be set to "250mm".
- G-code Flavor: Select【Marlin】to replace the default【Creality OS】.
- G-code Customization: Remove the G-code for Ender-3 S1 and set the G-code for Creality K1
【Start G-code】Field; K1 Custom Start G-code
【End G-code】Field
M82 ;absolute extrusion mode
M140 S0
M104 S0
START_PRINT EXTRUDER_TEMP=[material_print_temperature_layer_0] BED_TEMP=[material_bed_temperature_layer_0]
G92 E0
G92 E0
G1 F2400 E-0.5
M104 S0 ; turn off temperature
G28 X0 ; home X axis
M84 ; disable motors
3. Standard Settings:
- Layer Height: 0.2mm
- Line Width: 0.4mm
- Wall Thickness: Adjust as needed, with an original setting of 0.8mm.
- Infill Density: 20%
- Printing Temperature: 210°C
4. Print Speeds:
- General Speed: 300mm/s
- Wall Speeds: Inner: 300mm/s. Outer: 200mm/s
- Initial Layer Speed: 150mm/s
- Top and Bottom Speed: 200mm/s
- Print Acceleration: Min. 5000mm/s (K1 Series Max. Acceleration 20000mm/s²)
Creality K1 Cura Material-specific Settings
PLA:
- Print Temperature: 220°C
- Bed Temperature: 50°C
- Print Speed: 200-300 mm/s
- Layer Height: 0.2mm
- Retraction: 0.5 mm at 40 mm/s
- Cooling: 100%
- Fan Speed: 100%
- Infill:20%
- Initial layer speed: 10-20 mm/s
- Initial Fan Speed: 0%
ABS:
- Print Temperature: 260°C
- Bed Temperature: 100°C
- Print Speed: 200-300 mm/s
- Layer Height: 0.2mm
- Retraction: 0.5 mm at 40 mm/s
- Fan Speed: 0% (closed chamber)
- Cooling: 70%
- Infill:20%
- Initial layer speed: 10-20 mm/s
- Initial Fan Speed: 0%
TPU:
- Print Temperature: 220°C
- Bed Temperature: 70°C
- Print Speed: 100 mm/s
- Retraction: 0.5 mm at 30 mm/s
- Cooling: 100%
- Fan Speed: 0% (20% for bridges, overhangs, and small layers)
- Infill:20%
- Initial layer speed: 10-20 mm/s
- Initial Fan Speed: 0%
PETG:
- Print Temperature: 230°C
- Bed Temperature: 70°C
- Print Speed: 180 mm/s
- Retraction: 0.5 mm at 40 mm/s
- Cooling: 50%
- Fan Speed: 50-100%
- Infill:20%
- Initial layer speed: 10-20 mm/s
- Initial Fan Speed: 0%
By optimizing these parameters and slicing in Cura, you can achieve excellent printing results. This includes significantly reduced printing times, improved efficiency, and more refined print quality. The final step is to export the sliced file and upload it to the printer.
For more Creality 3D Printer with Other Slicer, you can click the related articles as follows:
Related Articles:
Ender 3 V3 Ke with Cura: Settings & Guide >>
Final Thoughts
I hope that these settings will solve your problems when using Cura with Creality 3D printers and allow you to print accurately and efficiently with various types of objects.
Read more:
Creality K1 Series Printing Parameter Settings
What is 3D Printing Retraction and How to Fix it
Recent News

8 Halloween 3D Print Ideas to Make Before October 31

Ender Series 3D Printers Parameter Comparison

Creality Back-to-School Sale 2026: Save Up to 50% on 3D Printers and More
