


Ender-3 V3 Troubleshooting Guide
We've compiled a comprehensive guide addressing common issues encountered with the Ender-3 V3 CoreXZ 3D Printer, including fault codes, subpar printing quality, glue leakage and overflow, as well as challenges with first layer adhesion. Our aim is to provide detailed solutions to these problems, offering assistance to users facing such issues.
1. Error Code Troubleshooting Guide
Coordinate exception error Key: 2243
1. Phenomenon description
The printer has a coordinate abnormality and reports an error Key: 2243.
2. Cause analysis
Slicing software error/wrong model selection/third-party software custom setting error.
3. Troubleshooting and solution
It is recommended to use random data slicing software for printing.
2527 Leveling sensor data transmission abnormality
1. Phenomenon description
2527 Levelling sensor data transmission abnormality occurs during self-test.
2. Cause analysis
Multiple machines perform zero return or self-check vibration pattern optimization at the same time. During levelling, the strain gauges are affected by resonance frequency and cause errors.
3. Troubleshooting and solution
After restarting, place the machine on the bottom/other desktop to perform a self-test.
2403 Error Troubleshooting
1. Phenomenon description
During the homing process, the machine presents Key: 2403 error, accompanied by the malfunction symptom of repeated Y-axis homing.
2. Troubleshooting and solution
Upgrade to the latest firmware version V1.2.1.0.
2564 Error Troubleshooting
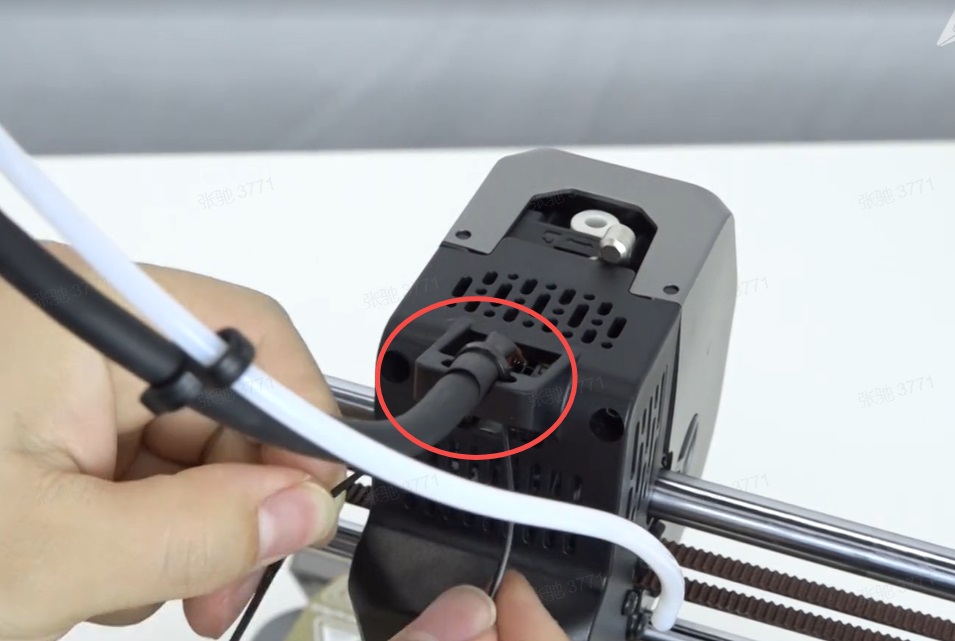
1. Phenomenon description
The screen displays "Error, key: 2564, the extruder is not heating as expected."
2. Cause analysis
2.1 Nozzle heating malfunction;
2.2 Thermosensitive detection malfunction.
3. Troubleshooting and solution
3.1 Check whether the nozzle heating and thermal wire are inserted in place;
3.2 Check whether the ceramic heating ring is damaged;
3.3 Check whether the heat-sensitive seat and heating rod seat are loose.
111 Error Troubleshooting
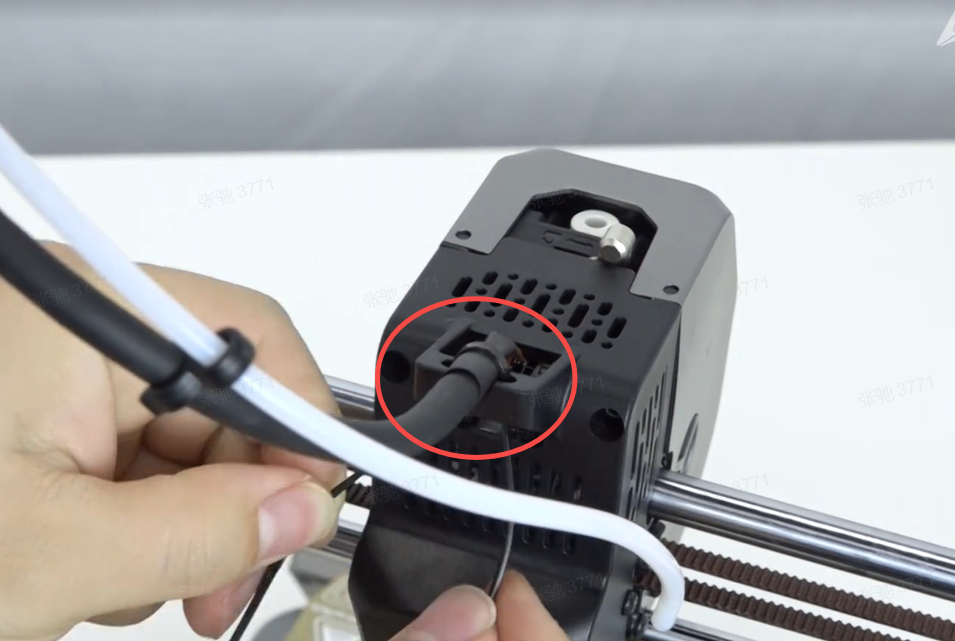
1. Phenomenon description
During startup or printing, the machine reports error Key: 111.
2. Cause analysis
There's abnormal communication between the mainboard and the nozzle adapter board.
3. Troubleshooting and solution
3.1 Check if the nozzle drag chain line is loose or missing binding tape.
3.2 Inspect the motherboard/nozzle adapter board for anomalies such as component damage or burn marks.
3.3 If the nozzle adapter board is faulty (e.g., poor contact, burnt, soldering issues), address it.
3.4 If the motherboard is faulty (e.g., poor contact, burnt, soldering issues), address it.
2000 Error Troubleshooting
1. Phenomenon description
After powering on or during the printing process, the machine shows error Key: 2000, often alongside other error codes.
2. Troubleshooting and solution
2.1 If Key: 2000 appears with other error codes (e.g., Key: 2564), first refer to solutions for those codes.
2.2 If only Key: 2000 is present, export the device log and send it to after-sales support.
Ender-3 V3 Log Export / Fault reporting tutorial
2529 Error Troubleshooting
1. Phenomenon description
Reports error Key: 2529, indicating an abnormal leveling sensor chip, sensor damage, or environmental impact.
2. Cause analysis
2.1 Environmental factors (e.g., vibration) around the equipment.
2.2 Abnormal Z-axis sensor chip, due to sensor damage or environmental impact.
3. Troubleshooting and solution
Place the device alone on a table or the ground and re-test.
Refer to after-sales video to replace the strain gauge and adjust the plate (replace all 4).
2526 Error Troubleshooting
1. Phenomenon description
During leveling or printing, the machine reports error Key: 2526, indicating Z-axis movement is not smooth or wire rod rotation issues.
2. Cause analysis
Software bug. To be optimized in the next firmware version.
3. Troubleshooting and solution
If Error 2526 occurs during leveling, self-check can typically resolve it.
If Error 2526 occurs during printing, click Continue Printing and perform a re-check after completion to resolve the issue.
2092 Error Troubleshooting
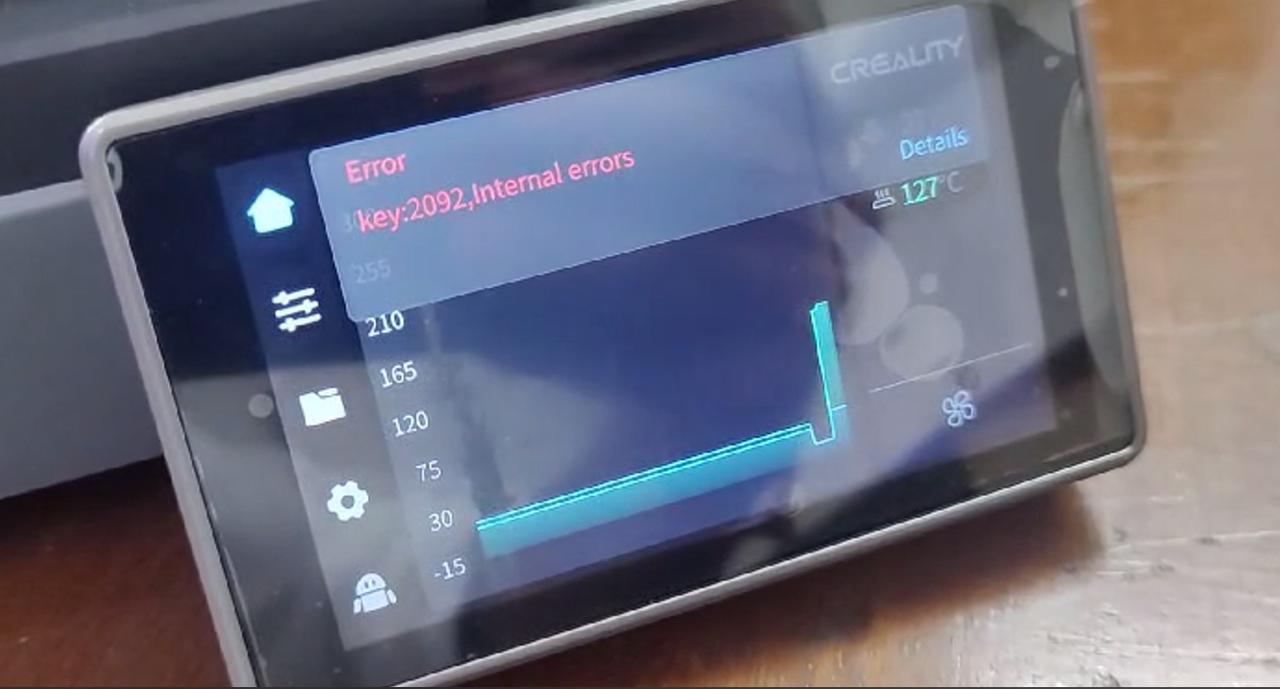
1. Phenomenon description
The temperature of the nozzle or heat bed exceeds the configured minimum or maximum (e.g., -14°, -100°).
2. Cause analysis
Thermal sensor disconnection on the heat bed or nozzle.
3. Troubleshooting and solution
Reconnect the thermal sensor wires for the heat bed or nozzle.
Check the screen for current temperature readings or manually heat the nozzle/heat bed to identify the issue, and replace the corresponding parts (nozzle kit/heat bed kit).
2561 Error Troubleshooting
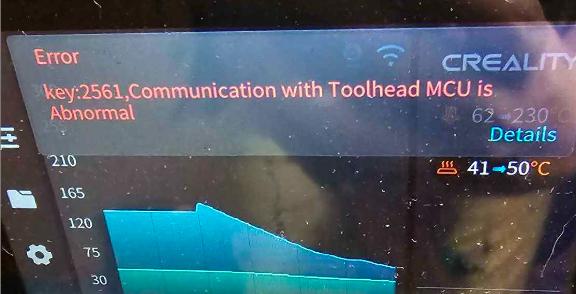
1. Phenomenon description
Communication with Toolhead MCU is abnormal.
2. Cause analysis
1. Loose nozzle ribbon cable.
2. Damaged ribbon cable.
3. Nozzle board issues.
4. Mainboard issues.
3. Troubleshooting and solution
a. Check both ends of the nozzle ribbon cable for looseness or damage. If intact, ensure it's securely connected. If damaged, replace it (photos of the connection can be requested for verification).
b. Update to the latest firmware. If the error persists, identify when the error occurs and provide logs.
2. Screen Assembly Wobble After Mounting
1. Phenomenon description
After unboxing and attaching the screen to the machine, it was found that the screen had severe vertical wobble.
2. Troubleshooting and solution
You can stick the available sponge adhesives on the back of the screen and then reassemble the screen onto the base casing.
3. Poor Printing in Silent Mode
1. Phenomenon description
Silent mode printing has problems with insufficient heat dissipation and motor streaks.
2. Cause analysis
Printing speed and fan speed are reduced in silent mode.
3. Troubleshooting and solution
It is recommended to use the recommended parameters for printing/the printing speed must be above 200mm/s and the model fan speed should be 100%.
4. First Layer Adhesion Issues/Model not Sticking to Build Plate/Nozzle Scraping Infill
1. Phenomenon description
1.1 Model does not adhere to platform during first layer printing;
1.2 Model detaches from platform during printing process;
1.3 Nozzle scrapes fill during model printing process.
1.4 Leveling detection abnormal, nozzle too high from build plate.
2. Cause analysis
2.1 The Platform contamination, residual print marks on the surface, not properly cleaned.
2.2 The actual printing material does not match the slicing parameters; for instance, used non-Hyper PLA but selected Hyper PLA material parameters for slicing.
2.3 Long-term high-speed printing can easily cause vibrations that affect the platform.
2.4 Did not use official printing parameters (jagged filling), self-set parameters (other filling styles) resulted in nozzle scraping issues.
3. Troubleshooting and solution
3.1 Check the platform for any debris. If there are remnants of printing materials, heat the build plate to above 80 degrees Celsius to soften the material for easier cleaning.
3.2 If using third-party printing materials, select generic types, e.g., Generic-PLA; it is recommended to use Hyper printing materials for optimal results.
3.3 Before each print, it is advised to activate the print calibration function to prevent the issue of the first layer not adhering.
3.4 If there is a problem with the nozzle scraping the infill, please check if the infill pattern in the print parameter settings is set to zigzag infill, or directly print a pre-sliced file that comes with it for verification.
3.5 Compensation in the Z-axis direction can be achieved through Expert Mode - Z-axis offset. (Applicable only for the current print.)
3.6 Compensation adjustment in the Z-axis can be performed through the slicer software Gcode (Z) offset.
3.7 Automatic generation of edges/smearing solid glue for the print bed adhesion option can effectively prevent issues with models not sticking.
3.8 Ensure there are no foreign objects on the build plate and Y-axis motion area, no wiring is touching the build plate, and re-level the platform.
5. Start-up Self-test Nozzle Crashes Directly into Build Platform
1. Phenomenon description
After self-check initiation, the nozzle crashes into the build plate.
2. Cause analysis
2.1 Upon unboxing, the limit switch cord was not connected, leading to abnormal homing of the device.
2.2 During the normal self-check, the printhead assembly will first trigger the X and Z axis limit switches, followed by homing on the Z axis.
3. Troubleshooting and solution
Check if the limit switch wires are installed correctly.
6. Machine Self-check Restart / Machine Heating Restart
1. Phenomenon description
The machine restarts during self-check heating/the screen restarts during machine self-test
2. Cause analysis
The power level was not adjusted as required when assembling the printer.
3. Troubleshooting and solution
Pls set the correct voltage before powering on to avoid damage. Toggle left for 230V (default) if the mains voltage is 200-240V, toggle right for 115V if the mains voltage is 100-120V.
7. Solutions for Glue Leakage and Overflow
1. Phenomenon description
During the printing process of the machine, the filament overflows near the nozzle/the filament covers the nozzle.
2. Cause analysis
During the printing process, the first layer of the model did not stick to the platform and was carried away by the nozzle, causing the nozzle outlet to be blocked and the filament to cover the nozzle.
Non-stick platform problem solutions pls back to First Layer Adhesion Issues/Model not Sticking to Build Plate/Nozzle Scraping Infill.
3. Troubleshooting and solution
3.1 Check whether the nozzle heating function is normal.
- If normal, heat the nozzle to 300°. Clean the filament near the nozzle fan cover, refer to the video on replacing the nozzle kit, and remove the fan cover. (Note here that the fan cable is unplugged after the power is disconnected)
- Reheat to 300° and clean the spill near the nozzle. (Note: Some areas cannot be melted by heating, you can use a heat gun/hair dryer to assist with heating.)
- Replace damaged parts, such as fan covers, air guides, etc., and reinstall them.
3.2 If the heating function is abnormal, unable to heat.
- Check whether the fan cover can be disassembled. If the fan cannot be disassembled due to overflow, you need to use a heat gun/hair dryer to clean the filament.
- Since it cannot be heated, you need to remove the nozzle kit with the heat sink block. (Just loosen the 2 screws selected in the picture below)
- Replace damaged parts, such as nozzle kits, fan shrouds, air guides, etc., and reinstall them.
8. Solution to the Problem of Abnormal Fan Noise/Auxiliary Cooling Fan not Rotating
Ender-3 V3 has four fans.
Throat Fan: Located on the left side of the heat sink block of the nozzle kit, its function is to cool the throat; The fan will work after heating the nozzle.
Mainboard Fan: Located at the bottom shell of the machine, its function is to cool the mainboard; The fan will operate as soon as printing starts, if not in printing status, it will only turn when the motherboard chip exceeds 45 degrees.
Model (Nozzle) Cooling Fan: Located within the fan shroud, its function is to cool the extruded filament at the nozzle, allowing the model to solidify and stabilize more quickly; This fan typically activates during the printing of the second layer (based on G-code parameter settings), or can be manually controlled via the screen settings.
Auxiliary Cooling Fan: Located behind the nozzle, it functions to cool specific areas of the model, such as overhangs and bridging areas; This fan is off by default and will only be turned on for specific areas of the model. (Slicing software for 3D Print) Can be manually set via the screen.
Through the information, you can confirm the position of the abnormal noise fan through the fan position and working mode, and then troubleshoot based on the cause of the abnormal noise.
1. Cause analysis
1.1 Filament interference.
1.2 Material residue interference.
1.3 Fan blade damage.
1.4 Fan anomaly.
2. Troubleshooting and solution
2.1 After confirming the position of the fan, it can be removed independently for testing to check for any abnormal noise; if there is none, it means there is interference in the fan assembly.
2.2 Check whether the fan blades are damaged or if there is residue from filament.
2.3 Replace the fan.
9. Nozzle Does not Discharge Filament
1. Phenomenon description
The nozzle does not discharge filament when printing starts.
2. Cause analysis
2.1 Filaments are wrapped around the material rack
2.2 Filament are not assembled in place
2.3 There are residual filaments in the nozzle and throat
2.4 Extruder jams
3. Troubleshooting and solution
3.1 Check whether the material rack is tangled and whether the anti-tangle material rack is correctly assembled.
3.2 Use scissors to cut the filament at 45° and straighten it, unlock the gear extruder and insert it into the feed port. If you feel that there is resistance and cannot continue to push down (the filament is loaded about 22mm), lock the gear extruder and perform the automatic feeding function.
3.3 Heat the nozzle to 240 degrees, straighten the filament, open the gear extruder, and feed the material manually.
3.4 The above methods cannot feed the filament. Please refer to the after-sales video - cleaning the nozzle through the needle to clean the nozzle.
10. Stringing / lack of Filament / Infill
1. Phenomenon description
The printed model has abnormal problems such as stringing / lack of filament / Infill
2. Cause analysis
2.1 Actual printing materials do not match the slicer settings; for example, using non-Hyper PLA, but having selected Hyper PLA material parameters for slicing.
2.2 Feeding is not smooth.
2.3 Extruder component anomaly.
3. Troubleshooting and solution
3.1 If using non-Hyper materials, select generic materials - for example, Generic-PLA; it is recommended to use Hyper materials.
3.2 Check whether the Teflon tube is deformed, causing difficulty in feeding.
3.3 Check the extruder gears for wear and damage.
11. Camera Turns on Night Vision in Daylight
1. Phenomenon description
The camera's night vision mode activates even during the day.
2. Cause analysis
2.1 The night vision detection sensitivity is high; if the front detection area does not detect enough brightness, night vision mode activates.
2.2 The current firmware does not support disabling night vision.
3. Troubleshooting and solution
The current firmware does not support modifications. A future update will include an option to disable night vision.
12. Screen Freezes or Goes Black After Modifying the Mesh Bed via Fluidd
1. Phenomenon description
After modifying the mesh bed in Fluidd, the program becomes unresponsive, causing the system to crash and the screen to freeze or go black.
2. Cause analysis
The current firmware does not support modifying the mesh bed.
3. Troubleshooting and solution
Access the Fluidd web interface, delete all configuration files, then shut down and restart the machine.
13. Extruder Abnormality / Extruder Jam / Extruder Abnormal Noise
1. Phenomenon description
1.1 The extruder makes obvious abnormal noise, and no filament flows out of the nozzle.
1.2 The printed model has defects such as stringing, lack of material, virtual layers, and insufficient extrusion.
2. Cause analysis
2.1 Analysis of Abnormal Noise Causes:
- Filament tangled on the spool, causing the extrusion motor to lose steps.
- Filament residue stuck in the front casing of the extruder.
- Filament jammed between the extruder gears.
- Filament clogged in the nozzle throat.
2.2 Analysis of Model Issues:
- Incorrect slicing settings.
- Damaged extruder gear.
- Misaligned extruder gear installation.
3. Troubleshooting and solution
Resolving Abnormal Noise:
- Check if the filament is tangled and ensure the anti-tangle material rack is installed correctly.
- Verify if the filament is stuck in the extruder or blocked in the throat.
- Heat the nozzle to 240°C (depending on filament type), unlock the extruder gear, and pull out the Teflon tube.
- If the filament can be manually pulled out, it indicates a throat blockage. Refer to after-sales video for nozzle cleaning.
- If the filament cannot be pulled out, it indicates an extruder blockage. Refer to after-sales video for cleaning the extruder.
- After cleaning the extruder, inspect the gears for damage and proper alignment.
Resolving Model Issues:
Check if the extruder gear is damaged or misaligned. If so, contact after-sales service.
14. Motor Port Clogged by Filament While Printing
1. Phenomenon description
The motor port is clogged by filament during printing.
2. Cause analysis
2.1 Incorrect filament input method.
2.2 Motor wires interfere with filament. Standard motor wire length is around 70 mm out of the bottom shell hole.
3. Troubleshooting and solution
- Refer to the operation video to correct filament input method.
- Check if motor wires are too long.
- Use the latest side material rack.
15. Printer Restarts While Hotend/Hot Bed Heating
1. Phenomenon description
The machine restarts during self-check or printing when heating.
2. Cause analysis
2.1 Improper power gear adjustment during assembly.
2.2 Insufficient switching power supply.
2.3 Short-circuited hotend kit.
2.4 Short-circuited hot bed.
3. Troubleshooting and solution
3.1 Adjust the machine to local voltage specification.
After adjusting voltage, if the machine restarts during heating, perform the following checks:
3.2 Isolate heating of hotend and hot bed to identify which causes restart.
3.2.1 If the hotend causes restart, unplug hotend kit flat cable and test.
- If heating is normal but the machine reports an error, replace the nozzle kit.
- If the machine restarts, check the mainboard or power supply stability with a multimeter. A stable 24V indicates a motherboard problem, otherwise a power supply issue.
3.3 If the hot bed causes restart, unplug hot bed heating wire and test.
- If heating is normal but the machine reports an error, repair the hot bed kit.
- If the machine restarts, check the mainboard or power supply stability with a multimeter.
Uneven Mesh Bed
1. Phenomenon description
The bed levelling appears uneven as shown in the picture.
2. Cause analysis
2.1 Loose strain gauge wiring.
2.2 Uneven torque on strain gauge fixing screws.
3. Troubleshooting and solution
3.1 Check and clean any debris under the strain gauges, ensure wiring is tight.
3.2 Slightly loosen all fixing screws for strain gauges, clean nozzle and platform and retest leveling.
3.3 If the issue persists, replace the leveling plate and strain gauges.
Recent News

8 Halloween 3D Print Ideas to Make Before October 31

Ender Series 3D Printers Parameter Comparison

Creality Back-to-School Sale 2026: Save Up to 50% on 3D Printers and More
