


Creality Ender 3 S1 Pro Filament Parameter Settings & Operation
Creality Ender 3 S1 Pro was launched in Feb.2022 which is an upgrade of Ender 3 S1. It supports high temperature and is compatible with multi-filament printing, giving makers more creative possibilities.

Creality Ender-3 S1 Pro 3D Printer: High-temp printing for more possibilities. Now $292.00 at Creality (Save $147.00) The Ender 3 S1 Pro supports temperatures up to 300℃ and multi-filament compatibility. Its "Sprite" full-metal dual-gear direct extruder ensures smooth feeding with 80N extrusion force. Featuring CR-Touch automatic bed leveling, a 4.3-inch LCD screen, and 96% pre-installed components, it promises both precision and user-friendly assembly for an efficient printing experience.

In this article, let's explore Ender 3 S1 Pro filament comprehensive guide.
How to Load the Filament on Your Ender 3 S1 Pro
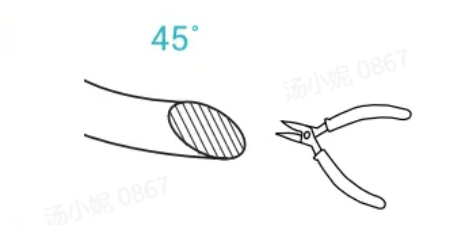
- In order to successfully load the filament, please trim the end of the filament at an angle of 45 degrees.
- Press the filament until it passes through the filament detection hole. Then press and hold the extruder handle to insert the filament into the extruder hole until it reaches the nozzle.
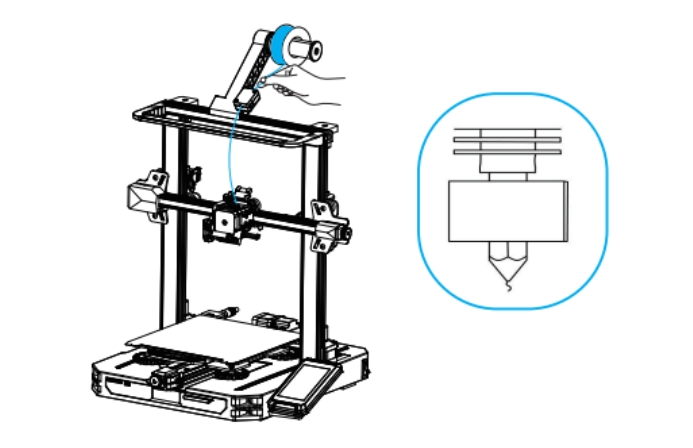
- Warm up the nozzle. If the filament flows out of the nozzle when the temperature reaches the target value, the filament is properly loaded.
How to Change the Filament Ender 3 S1 Pro
When the printer is not printing:
- Heat the nozzle to over 185℃, and wait until the filaments inside the nozzle are softened. Press the extrusion handle, push the filaments downwards to see if there is any filament coming out of the nozzle, and then quickly pull out the filaments to prevent them from being stuck in the throat pipe.
- Place the new filament onto the rack and repeat the steps of How to Load the Filament.
When the printer is printing:
- Pause the printing. After the printer stops, press and hold the extrusion handle and quickly extract the filament to prevent it from clogging in the heat break.
- Place the new filament onto the rack and press it through the filament detector. Press and hold the extrusion handle to insert the filament into the nozzle. Then push the filament to squeeze out the residual filament in the nozzle and clean up the nozzle before resuming printing.
Ender 3 S1 Pro Mid-Print Filamenet Change Video Guide
Ender 3 S1 Pro Retraction Settings: How to Unload Filament
| Ender-3 S1 Pro Filament Guide | ||||||||
| Filament |
Enclosure Printing |
Dry Box |
Retreat Distance |
Retreat Speed |
Heatbed |
Nozzle |
Fan Speed |
Printing Speed |
| CR-PLA | NO | NO | 0.8mm | 40mm/s | 60℃ | 200℃ | 100% | 50mm/s |
| CR-ABS | YES | YES | 0.8mm | 40mm/s | 100℃ | 240℃ | 20% | 50mm/s |
| CR-TPU | NO | NO | 2.0mm | 40mm/s | 30℃ | 225℃ | 100% | 30mm/s |
| CR-PETG | NO | YES | 1mm | 40mm/s | 90℃ | 220℃ | 40% | 50mm/s |
| CR-Carbon(PLA) | NO | YES | 1mm | 40mm/s | 60℃ | 205℃ | 40% | 50mm/s |
| CR-Carbon (Nylon) | YES | YES | 0.8mm | 40mm/s | 110℃ | 240℃ | 0% | 50mm/s |
| CR-Silk | NO | YES | 0.8mm | 40mm/s | 60℃ | 210℃ | 100% | 50mm/s |
| CR-PLA Wood | NO | NO | 0.8mm | 40mm/s | 60℃ | 200℃ | 100% | 50mm/s |
| CR-Nylon | YES | YES | 0.6mm | 40mm/s | 110℃ | 240℃ | 0% | 50mm/s |
| HP-ASA | YES | YES | 0.8mm | 40mm/s | 100℃ | 245℃ | 20% | 50mm/s |
| HP-TPU | NO | NO | 1.6mm | 40mm/s | 30℃ | 205℃ | 100% | 30mm/s |
| eSUN-TPU | NO | NO | 1.6mm | 40mm/s | 30℃ | 215℃ | 100% | 30mm/s |
Note: The above parameters are official recommended settings. Different machines and different filament have different settings. Please refer to the actual situation.

Recent News

8 Halloween 3D Print Ideas to Make Before October 31

Ender Series 3D Printers Parameter Comparison

Creality Back-to-School Sale 2026: Save Up to 50% on 3D Printers and More
