


How to Print TPU
TPU (Thermoplastic polyurethane) is a popular 3D printing material known for its flexibility and durability, making it ideal for creating elastic and resilient objects like phone cases and wearable devices. Its unique characteristics open up a wide range of applications, from functional prototypes to consumer products, making it an essential filament for both hobbyists and professionals in the 3D printing community.
This guide provides essential tips and tricks for how to print TPU, covering setup, settings, and troubleshooting common issues. Finally, we will offer a tutorial guide on how to print TPU with your K1/K2 Series 3D Printer to help you achieve high-quality prints and fully utilize this versatile filament.
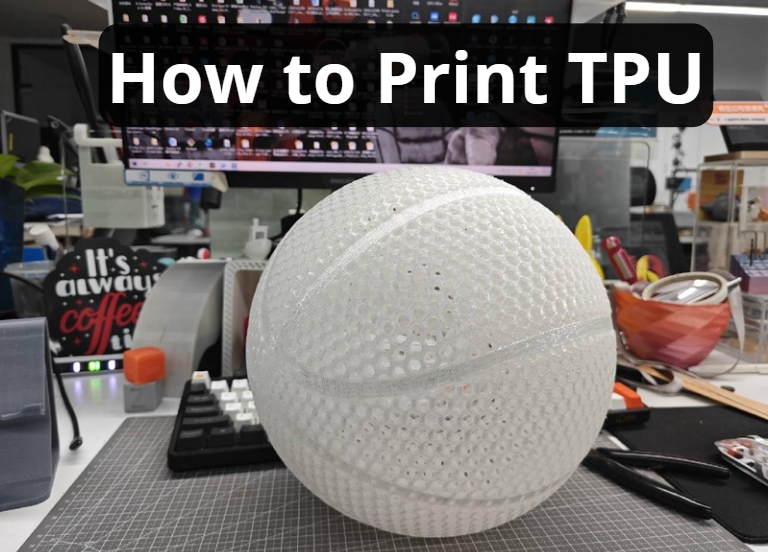
What is TPU?
TPU, or thermoplastic polyurethane, is a type of thermoplastic elastomer (TPE) valued for its flexibility, durability, and resistance to abrasion and impacts.
TPU has diverse applications, including automotive panels, caster wheels, power tools, sporting goods, medical devices, drive belts, footwear, and more. It's popular for device cases, wire and cable jacketing, high-performance films, and 3D printing due to its flexibility and durability.
3D Printer Setup for TPU
1. 3D Printer Requirements
To print with TPU filament, ensure your 3D printer is equipped with a direct drive extruder, as it provides better control and reduces the risk of filament kinking or jamming. Creality's early Ender series printers primarily used Bowden extruders. However, starting from 2022, nearly all the new models, such as K1 Series, Ender-3 V3 Series have switched to direct drive extruders. This change has allowed Creality 3D printers to be compatible with a wider range of filaments and to better accommodate different material properties. Additionally, make sure the printer has a heated bed and can reach the necessary temperature settings for TPU.
2. Nozzle and Bed Temperature Settings
TPU typically prints well at nozzle temperatures between 210°C and 240°C. The bed temperature should be set between 50°C and 60°C to promote proper adhesion without causing warping. It’s important to fine-tune these settings based on your specific filament and printer model. Click TPU Bed and Filament Temperature Settings to know more.
3. Bed Adhesion Techniques
Good bed adhesion is crucial when printing with TPU. Use a build surface designed for flexible filaments, or apply a thin layer of glue stick or blue painter’s tape to the bed. This helps the first layer stick better and reduces the risk of print failures.
4. Cooling
Cooling plays a crucial role in printing with TPU. A cooling fan set to 100% after the first few layers can improve print quality by solidifying the layers more quickly, preventing sagging.
Preparing Your TPU 3D Printer Filament
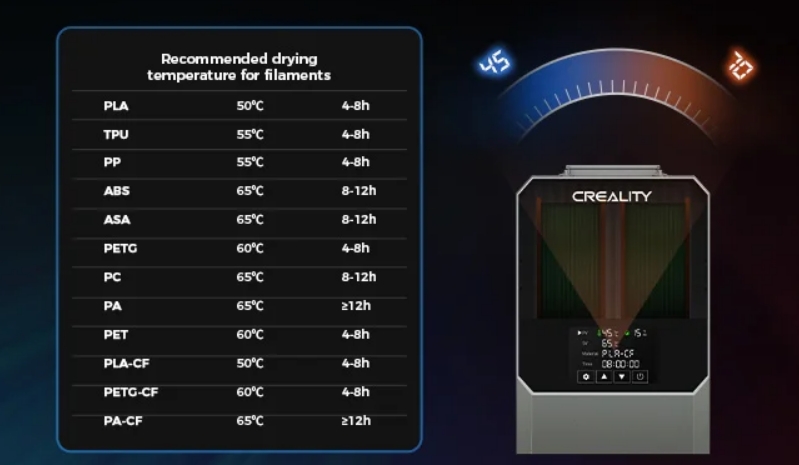
1. Storage and Moisture Control
TPU filament is hygroscopic, meaning it absorbs moisture from the air. Store your TPU in a dry box or sealed bag with desiccant packs to keep it dry. If the filament absorbs too much moisture, it can lead to poor print quality and bubbles in your prints.
2. Loading the Filament Properly
When loading TPU filament, feed it slowly and gently into the extruder to avoid bending or kinking. Ensure the filament path is smooth and free of obstructions. This helps prevent jams and ensures a consistent flow of filament during printing.
Slicer Settings for TPU
Proper slicer settings are essential for successful TPU prints:
1. Print Speed Adjustments
Print slowly! TPU prints best at slower speeds due to its flexible nature. A print speed of 20-30 mm/s is recommended to maintain control and accuracy. Adjust the speed based on your printer’s performance and the specific TPU filament being used.
2. Retraction Settings
Minimize retraction distance and speed to avoid clogging or jamming. Retraction settings around 1-2 mm at a speed of 20-30 mm/s work well for TPU. Experiment with these settings to find the optimal balance for your printer.
Creality Official recommended retraction distance and retraction speed settings
3. Layer Height and Extrusion Width
Use a layer height of 0.1-0.2 mm for better detail and a smoother finish. Adjust the extrusion width to match your nozzle diameter, typically 100-120% of the nozzle size, to ensure proper filament flow and adhesion between layers.
4. Cooling Fan Settings
Lower the cooling fan speed or turn it off during the first few layers to improve bed adhesion. Gradually increase the fan speed to 30-50% for the rest of the print to help solidify the layers without causing warping.
TPU 3D Printing Techniques
1. Avoiding Stringing and Oozing
Reduce stringing and oozing by fine-tuning your retraction settings and lowering the print temperature if necessary. Enable coasting or wipe features in your slicer software to minimize filament buildup at the end of each print move.
2. Ensuring Proper Adhesion
Ensure proper adhesion by calibrating your bed level and adjusting the first layer height. A well-leveled bed and optimal first layer height create a solid foundation for your print, reducing the risk of warping and detachment.
3. Managing Warping and Shrinking
Prevent warping and shrinking by maintaining a stable ambient temperature around your printer. Use an enclosure if available, and avoid drafts or sudden temperature changes during printing.
Troubleshooting Common Issues for Printing TPU Filament
1. Under-Extrusion
If you experience under-extrusion, check for clogs in the nozzle and ensure the filament is feeding smoothly. Increase the print temperature slightly or adjust the extrusion multiplier in your slicer to improve filament flow.
2. Over-Extrusion
Over-extrusion can be resolved by lowering the print temperature or reducing the extrusion multiplier. Ensure your filament diameter is correctly entered in the slicer settings to prevent excessive filament flow.
3. Layer Shifts and Misalignments
Layer shifts and misalignments may be caused by loose belts or insufficient motor current. Check and tighten your printer’s belts and adjust the motor current settings to ensure consistent layer alignment.
4. Print Surface Issues
If you encounter print surface issues, such as poor adhesion or rough surfaces, recalibrate your bed level and adjust the first layer height. Experiment with different bed adhesion techniques to find the best solution for your setup.
Visit Common FDM 3D Printer Troubleshooting Guide to find your solutions.
How to Print TPU with Your K1 / K2 Series Printer
1. Preparation for Print TPU
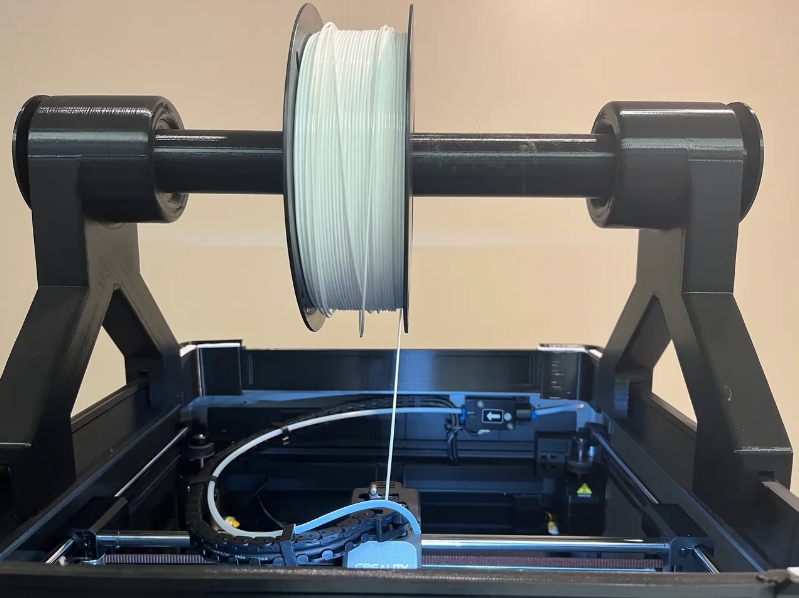
Due to the large feeding resistance of Teflon tubes in K-series machines, printing TPU from the machine’s built-in filament rack will cause empty printing and insufficient extrusion. So it cannot use the Filament Detector Kit Function. Pls cut a piece of filament and insert it in the Filament Detector Kit, or choose to ignore the Filament Detector Kit when printing.
Start your TPU printing as the following steps:
- Open the upper cover of the machine and feed from the top of the machine. Do not feed from the Teflon tube of the machine. The filament rack is higher than the machine.
- Fix the original Teflon tube of the machine to prevent the model from being scratched during printing.
- TPU easily gets moisture, so please use freshly opened filaments or dry them before use; otherwise, defects such as printing stringiness and poor surface quality may occur.
- Choose TPU with a hardness of 95A or above, such as the common TPU95A/TPU64D
2. Slicer Printing Settings
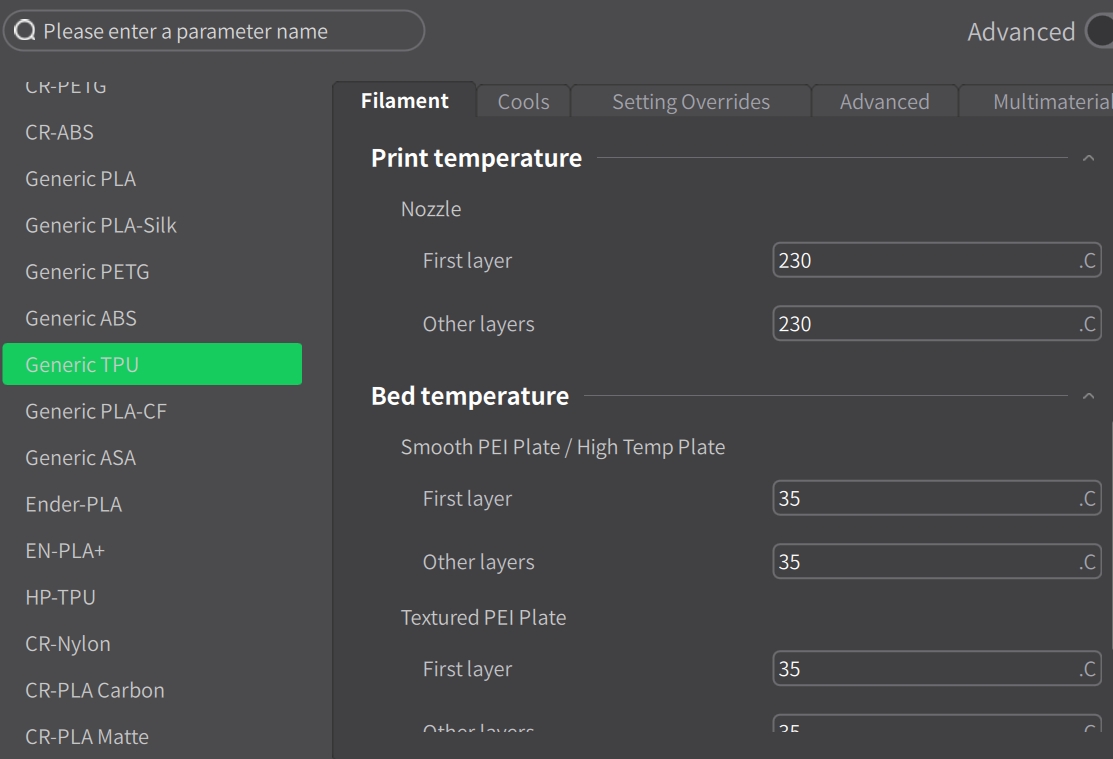
- Select Generic TPU or CR-TPU filament in Creatlity Print, the default print temperature 230°, print bed temperature 35°
- If using a third-party software, manually adjust the printing speed to below 50mm/s.
- If the surface quality is poor, you can manually lower the printing temperature to 205-215℃.
More, you can visit K2 Plus TPU Printing on Creality Forum or Creality K1 Series Printing Parameter Settings
TUP Printing Tips and Tricks
Effectively printing with TPU involves careful support removal, smoothing and finishing techniques, and the ability to customize prints with painting and dyeing. Advanced tips include using multi-material printing, combining TPU with other materials for enhanced properties, and experimenting with infill patterns and densities. By mastering these post-processing and advanced techniques, you can achieve high-quality, functional TPU prints that meet your specific needs.
Faqs about How to print TPU
1. What are the essential printer settings for printing TPU?
- Direct Drive Extruder:Reduces the risk of filament kinking or jamming.
- Print Bed:Ensure proper leveling; set temperature to 40-60°C.
- Nozzle Temperature:220-250°C, with 235°C being a good starting point.
- Print Speed:20-30 mm/s for better control.
- Retraction Settings:Minimal retraction, around 1-2 mm at 20-30 mm/s.
2. How can I improve bed adhesion for TPU prints?
- Use a PEI build surface or blue painter’s tape.
- Apply a glue stick layer for additional adhesion.
- Ensure the print bed is correctly leveled and set to the right temperature (50-60°C).
3. What should I do if my TPU prints have stringing or poor surface quality?
- Adjust Retraction:Minimize distance and speed.
- Print Slowly:Use a print speed of 20-30 mm/s.
- Check Filament Storage: Ensure TPU filament is dry to avoid moisture-related defects.
- Fan Settings:Increase cooling fan speed after the first few layers to solidify the print better.
Conclusion
Printing with TPU requires specific settings, careful handling, and optimized techniques for high-quality results. Experiment with different settings and materials to improve your skills. Utilize online resources, forums, and tutorials for additional guidance and stay updated on 3D printing advancements to achieve the best outcomes with TPU prints.
Recent News

8 Halloween 3D Print Ideas to Make Before October 31

Ender Series 3D Printers Parameter Comparison

Creality Back-to-School Sale 2026: Save Up to 50% on 3D Printers and More
